Meet the ComfyUI diffusion node interface: instead of a form with a prompt box and a button, you build a graph where each box (load a model, encode a text, sample, decode) is one step of generating an image, video, audio or 3D asset. The Comfy-Org/ComfyUI repository has about 141,800 stars and 16,800 forks as of the check on 22 October 2026, and it is published under the GPL-3.0 licence.
For an SRE or a developer the interest is twofold. On one side, a workflow is a reproducible JSON file and the server exposes a local HTTP API. On the other, it is a Python server that occupies a GPU, reads models of several gigabytes and loads third-party code as custom nodes: it should be monitored like any other service.
A note on honesty: span.observer has not installed or run ComfyUI for this article. The commands come from the README and the repository code, and the screenshots come from the project’s official documentation or are extracts rendered from the repository.
ComfyUI diffusion node interface: what the repository says
- Publisher: Comfy Org. The current repository is
Comfy-Org/ComfyUI; several README links (badges, releases) still point to the formercomfyanonymous/ComfyUIspace. - Language: Python for the server (
main.py,server.py). The front end lives in a separate repository,ComfyUI_frontend, shipped as a PyPI package. - Figures checked on 22 October 2026 on the repository page: about 141,800 stars, about 16,800 forks. The
comfyui_version.pyfile on the main branch reads version 0.42.0; the releases list could not be read on the page, so I do not quote a release date. - Platforms: Windows, Linux and macOS, with a desktop app, a Windows portable build or a manual install; NVIDIA, AMD, Intel, Apple Silicon and Ascend GPUs according to the README.
- Release cycle: the README describes a weekly target with no guarantee, and warns that commits outside the stable tags “may be very unstable and break many custom nodes”.
The project presents itself as a highly optimised inference engine for consumer hardware, able to run big models with 4 GB of VRAM and 8 GB of RAM thanks to “asynchronous weight streaming”. That is a claim in the README which span.observer has not measured.
The GPL-3.0 licence: what it implies
The LICENSE file is the text of the GNU General Public License version 3. It is a copyleft licence. In practice:
- You may use, study, modify and redistribute ComfyUI, including professionally, without paying for a licence.
- If you distribute a modified version (or a product derived from it), you must distribute it under GPL-3.0, with the corresponding source code.
- Purely internal use, with no redistribution, does not oblige you to publish your changes.
- The GPL covers ComfyUI’s code. The model weights you load have their own licences, and partner nodes (access to closed models through an API, per the README) are subject to their providers’ terms.
For a specific case (a distributed custom node, integration into a product), have the scope checked by your legal team: this summary is not legal advice.
A tour of the interface
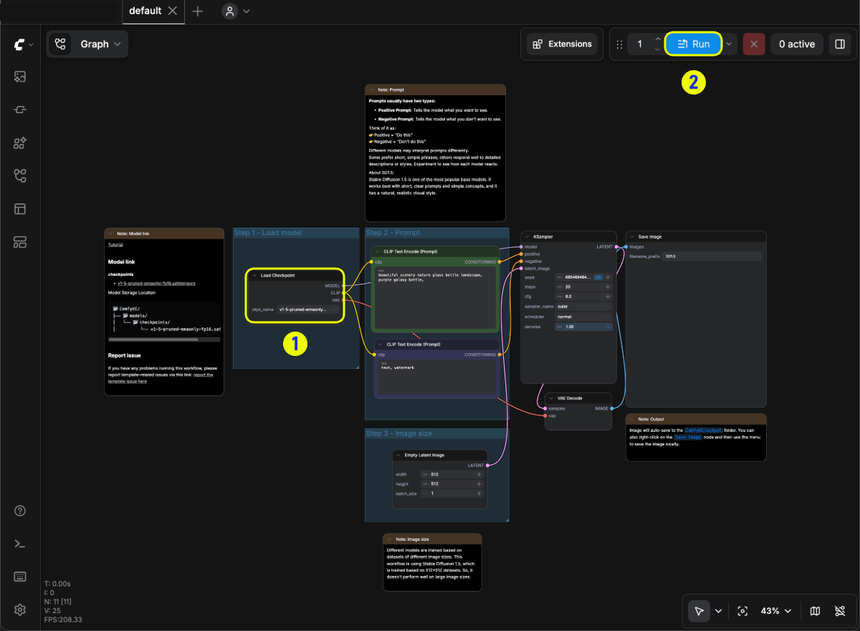
The official documentation shows the default graph, an image generation workflow with Stable Diffusion 1.5. Nodes are grouped into steps: load the model (Load Checkpoint), write the positive and negative prompts (two CLIP Text Encode nodes), choose the size (Empty Latent Image), sample (KSampler), decode (VAE Decode) and save (Save Image). The Run button starts the execution.
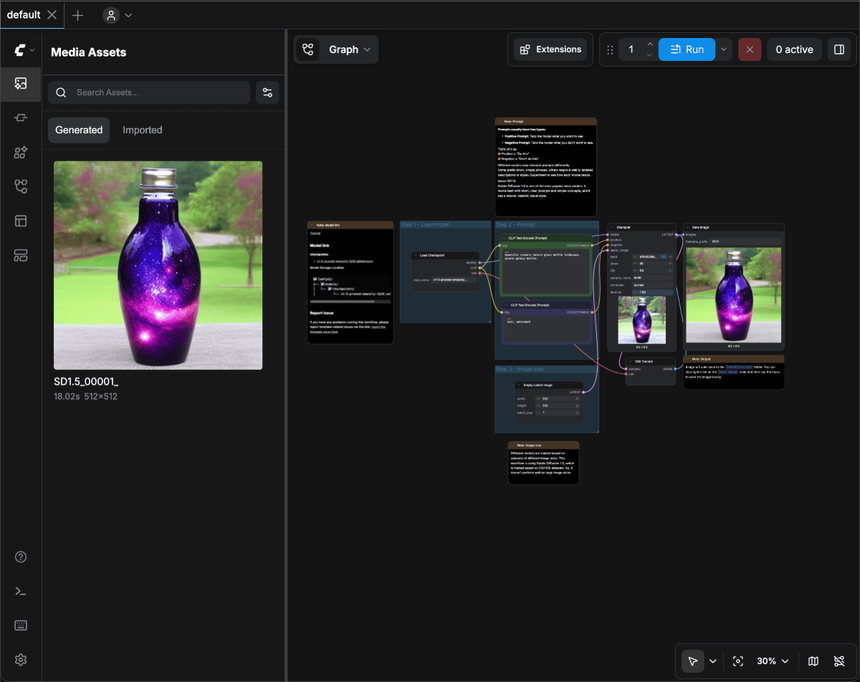
After the run, the image appears in the Save Image node and in the generated media panel, with its duration and size. The README says that dragging a generated PNG onto the page reloads the complete workflow, seed included: this is what makes results reproducible.
Other README points: only the parts of the graph whose inputs are valid are executed, and only those that changed since the last run are recomputed. Submitting the same graph twice therefore does not recompute the first result.
Step-by-step installation
Option 1: the desktop app
The README recommends the desktop app for new users, available for Windows and macOS, through the download link on comfy.org.
Option 2: the Windows portable archive
A standalone 7z archive exists for NVIDIA, AMD and Intel GPUs; the README does not recommend it for regular users. Extract it with 7-Zip. Checkpoints go in ComfyUI\models\checkpoints. The current build ships Python 3.13 and PyTorch CUDA 13.0; update your NVIDIA drivers if it does not start.
Option 3: comfy-cli
pip install comfy-cli
comfy install
Option 4: manual install (Windows, Linux, macOS)
The README says Python 3.13 is “very well supported” (3.14 works, with caveats for some custom nodes). Steps for an NVIDIA GPU:
- Clone the repository, then put your checkpoints in
models/checkpointsand your VAEs inmodels/vae. - Install PyTorch with the CUDA index from the README:
pip install torch torchvision torchaudio --extra-index-url https://download.pytorch.org/whl/cu130 - Install the dependencies, inside the repository folder:
pip install -r requirements.txt - Start the server:
python main.py
For AMD, Intel, Apple Silicon or Ascend, the README gives other PyTorch commands: follow the matching section rather than the NVIDIA one. Models are not shipped with the repository: you download them yourself and respect their licence.
Limits and open points
- Custom nodes: these are Python packages executed inside the server process. The ComfyUI-Manager is enabled with
python main.py --enable-manager(afterpip install -r manager_requirements.txt, per the README), and--disable-all-custom-nodesturns them all off. Only install nodes whose code you have read. - Network exposure: by default the server listens on
127.0.0.1, port 8188 (values read incomfy/cli_args.py).--listenwith no argument opens all interfaces. The README offers--tls-keyfileand--tls-certfilefor TLS, with a self-signed certificate that is “not appropriate for shared/production use”. No authentication is described in the README: put an authenticated reverse proxy in front of any remote access. - Stability: work on a stable tag, not on the main branch, as the README advises.
- Outbound data: core downloads nothing unless you ask, according to the README;
--offlinedisables the paid partner nodes and sets a restrictive content security policy for the front end.
Monitoring a ComfyUI server
According to the README, ComfyUI does not export OpenTelemetry traces; observability relies on its API and its logs. The code in server.py declares these routes, among others:
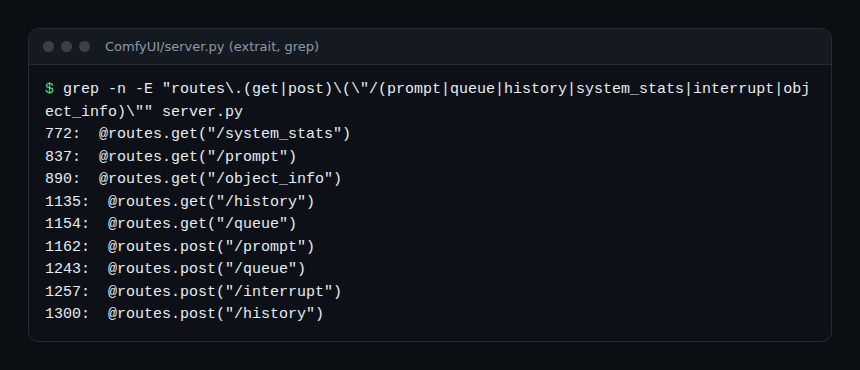
GET /system_statsreturns the operating system, total and free RAM, the ComfyUI and PyTorch versions, and, for each GPU,vram_totalandvram_free. Careful: the response also containsargv, the full command line; do not expose it publicly.GET /queuelists the running jobs (queue_running) and the pending ones (queue_pending). Queue depth is your first saturation indicator.GET /historyreturns completed runs;POST /interruptstops the current execution.
For logs, --verbose sets the logging level and --log-stdout sends output to stdout instead of stderr, handy for a container. A simple pattern: a small script polls /system_stats and /queue every minute and publishes free VRAM and queue length as OpenTelemetry metrics, which Dynatrace SaaS or Dynatrace Managed (or any other OTLP backend) can ingest. That is our own recipe, not a ComfyUI feature. For collection, see OpenTelemetry and Prometheus: complementary.
How to check that it works
- After
python main.py, openhttp://127.0.0.1:8188: the default graph is displayed. - A
GET /system_statsrequest should return your GPUs and their free VRAM. - Run the default workflow with a checkpoint in place: the image appears, and
/historycontains the run.
Best practices
- Stay on a stable tag and record the version (
comfyui_versionin/system_stats) in your change log. - Keep the server on the loopback interface, or behind an authenticated proxy with TLS.
- Audit every custom node before installing it, and use a dedicated system user.
- Watch free VRAM and the queue: a model that is too large fails abruptly, not gradually.
- Version your JSON workflows; they document a generation better than any ticket. For other building blocks of a local stack, see the self-hosted open source AI stack.
Frequently asked questions
Is ComfyUI free for commercial use?
The software is under GPL-3.0, which allows commercial use. Models have their own licences, sometimes restrictive, and paid partner nodes depend on their providers. Check each licence.
Do I need a powerful GPU?
The README claims it can run big models with 4 GB of VRAM and 8 GB of RAM, and also mentions a CPU-only option for the portable archive. Performance depends on the model: test with yours.
Can it be used in a toolchain or with agents?
The README mentions a local API and endpoints for integrating it into production pipelines. If an agent drives the server, apply the guardrails for AI agents in production.
Conclusion
ComfyUI is worth a look if you want to control every step of a generation and replay it identically. The price: a GPU server to install properly, a GPL licence to understand and third-party nodes to watch. For what a neighbouring tool does on the image side, see PhotoCraft, an open source photo editor in Rust. Sources: the Comfy-Org/ComfyUI repository and the ComfyUI documentation.
span.observer is an independent community blog, not affiliated with Dynatrace LLC or the projects mentioned. Trademarks belong to their owners. Tools change quickly: check commands and options in their official documentation.