The DDOT Datadog collector is the OpenTelemetry Collector distribution that Datadog embeds in its Agent. For an SRE team that already runs the Agent, the question is simple: keep a separate upstream Collector, or let the Agent carry the OpenTelemetry pipelines too? This article describes what DDOT contains, how to install it on Kubernetes and Linux, and what it changes for operations, based on the Datadog documentation read on 30 October 2026.
Scope: this text is about Datadog, not Dynatrace. It is an honest reference point for anyone choosing how to route OpenTelemetry signals. For the wider picture, see the Dynatrace and Datadog comparison.
DDOT Datadog collector: what it is
According to the Datadog documentation, the DDOT Collector (Datadog Distribution of OpenTelemetry) is an open source solution that “combines the flexibility of OpenTelemetry with the comprehensive observability capabilities of Datadog”. It is embedded in the Datadog Agent and bundles three things: curated OpenTelemetry components, the Agent’s own collection and processing, and a few custom Datadog components.
It is therefore not the full “contrib” Collector. The documentation lists a precise set of components:
- Receivers:
otlpreceiver,prometheusreceiver,filelogreceiver,hostmetricsreceiver,kubeletstatsreceiver,jaegerreceiver,zipkinreceiver, among others; - Processors:
batchprocessor,memorylimiterprocessor,k8sattributesprocessor,resourcedetectionprocessor,transformprocessor,tailsamplingprocessor,probabilisticsamplerprocessor, and so on; - Exporters:
datadogexporter,otlpexporter,otlphttpexporter,loadbalancingexporter,debugexporter; - Connectors:
datadogconnector,routingconnector,spanmetricsconnector; - Datadog components: an Infrastructure Attribute Processor, a Converter and a DD Flare extension.
If a component is missing, the documentation points to a “Use Custom OpenTelemetry Components” guide. The reference file is the manifest in the DataDog/datadog-agent repository (comp/otelcol/collector-contrib/impl/manifest.yaml). Check it before migrating an existing configuration: it is the first cause of blockers.
Prerequisites and versions to know
The Kubernetes installation page lists these prerequisites:
- a Kubernetes cluster at version 1.29 or later;
- Helm 3 or later, and
kubectl; - a Datadog account and API key;
- an Agent image tag of 7.67.0 or later for the
ddot-collectorimage; - with the Datadog Operator, version 1.22.0 or later: the DDOT container then uses the
ddot-collectorimage instead of the-fullimage.
The ports to open are 4317 and 4318 (OTLP gRPC and HTTP), 8126 over TCP (Datadog trace intake) and 8125 over UDP (DogStatsD). On maturity, the main page states no overall status (GA or preview). It only flags Remote Configuration for the DDOT Collector as Preview, and the migration page says Gateway deployment is in Preview. The DaemonSet is presented as the supported mode. EKS Fargate is not supported.
I could not confirm a single minimum Agent version for DDOT: the main page does not give one. Any “7.65” threshold is therefore unverified; keep the thresholds cited above (7.67.0, 7.78).
Install the DDOT Collector on Kubernetes with Helm
Step 1: add the repository and create the API key secret.
helm repo add datadog https://helm.datadoghq.com
helm repo update
kubectl create secret generic datadog-secret \
  --from-literal api-key=<DD_API_KEY>
Step 2: enable the Collector in the values file. The key that matters is datadog.otelCollector.enabled. The hostPort entries expose OTLP on the node.
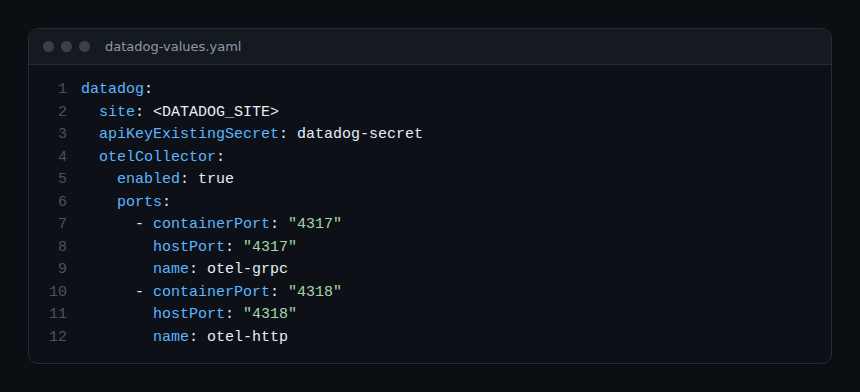
Step 3: deploy with the default Collector configuration.
helm upgrade -i <RELEASE_NAME> datadog/datadog -f datadog-values.yamlFor a custom pipeline configuration, add --set-file datadog.otelCollector.config=otel-config.yaml. With the Datadog Operator, the equivalent is features.otelCollector.enabled: true in the DatadogAgent resource (datadoghq.com/v2alpha1); the Operator then binds the Collector to ports 4317 and 4318 by default.
The default configuration described in the documentation includes an otlp receiver for all signals, a prometheus receiver, the infraattributes and cumulativetodelta processors, and the datadog exporter. The exporter reads ${env:DD_API_KEY} and ${env:DD_SITE}. For infraattributes to add Kubernetes tags, telemetry must carry the container.id resource attribute.
Install DDOT on Linux
The documentation also covers Linux hosts (bare metal and virtual machines). On a new host, the Agent install script accepts the DD_OTELCOLLECTOR_ENABLED=true variable. On a host where the Agent is already present at version 7.78 or later, the sudo datadog-agent otel install command adds the Collector.
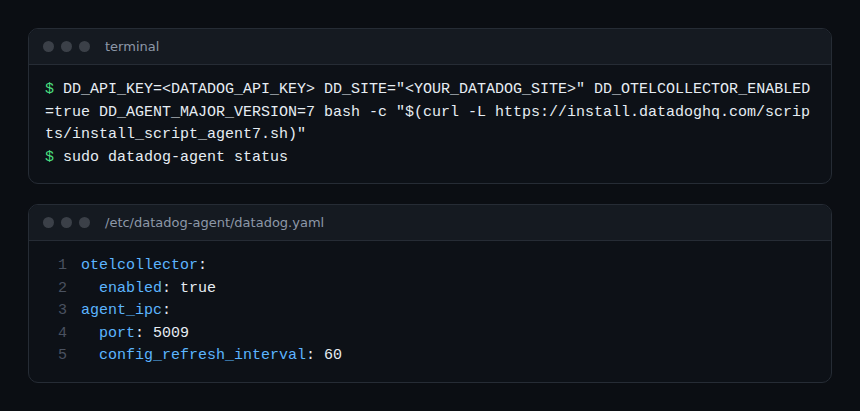
The /etc/datadog-agent/datadog.yaml file carries otelcollector.enabled: true, and /etc/datadog-agent/otel-config.yaml is the starting configuration. Restart the Agent after changing either file. I did not find the restart command on this page: check the documentation for your distribution. The Linux page does not say whether this path is in preview either, so that point stays unverified.
Send application telemetry to DDOT
In the application’s Deployment, point the OpenTelemetry SDK at the node IP. The documentation gives these environment variables.
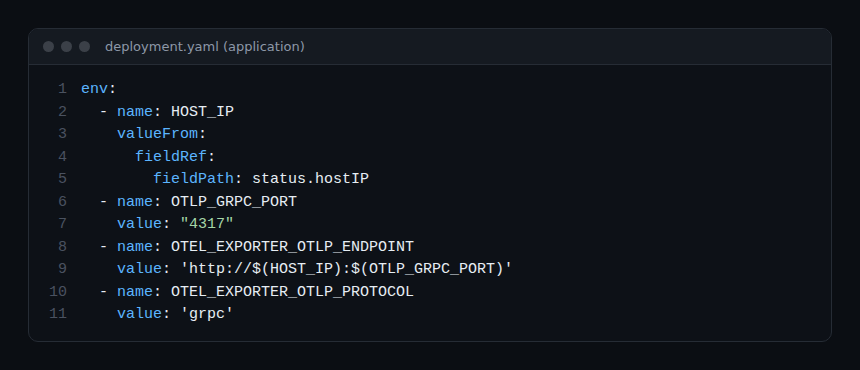
For unified service tagging, set OTEL_SERVICE_NAME and OTEL_RESOURCE_ATTRIBUTES with service.version and deployment.environment.name. The documentation advises against combining them with Datadog-specific Kubernetes labels, because that creates duplicate tags.
How to check that it works
On Linux, sudo datadog-agent status should show an “OTel Agent” section with the status Running. On Kubernetes, the page gives no verification command; it points to the Datadog interface: Fleet Automation (Agent and Collector configuration), Infrastructure Host List, Logs Explorer, Trace Explorer and the OTel Collector health dashboard. After redeploying the application, traces and metrics should appear there.
What DDOT changes for an SRE team
- Fewer moving parts: one DaemonSet carries the Agent and the Collector, instead of two upgrade cycles. The trade-off is coupling: the Collector version follows the Agent’s.
- A limited component catalogue: anything outside the list requires the custom components procedure. Compare with your current configuration before migrating.
- Different defaults: the migration page warns that DDOT defaults can differ from the upstream Collector’s, for example for
filelogreceiver. - A cost to watch: the documentation notes that some options (APM, process collection,
podLabelsAsTags) may incur charges or affect custom metrics. I quote no price; check Datadog’s official pricing page.
The OpenTelemetry link is real: the OTLP receiver, the processors and the exporter come from the OpenTelemetry ecosystem, and your applications keep standard SDKs. With Dynatrace the logic differs: you can also send OTLP through a Collector, as described in the OpenTelemetry Collector on Kubernetes. I claim no integration between DDOT and Dynatrace, because the documentation I read describes none. For sampling, see tail sampling with OpenTelemetry.
Frequently asked questions
Does DDOT replace the upstream OpenTelemetry Collector?
It can if your configuration only uses the included components. The documentation offers a step-by-step migration guide. Otherwise, add custom components or keep the upstream Collector.
Does DDOT work on Linux and on Kubernetes?
Yes, the documentation describes installation on Kubernetes (DaemonSet) and on Linux hosts. The migration page says EKS Fargate is not supported.
Should I use DDOT if I already send OTLP to Datadog?
Not necessarily. It depends on your need for local pipelines and your appetite for a Collector coupled to the Agent. For the wider context, see OpenTelemetry and Prometheus.
Conclusion
DDOT puts an OpenTelemetry Collector inside the Datadog Agent, with a defined component catalogue and two documented install paths. Check your components first, test on one node, then migrate. Official references: DDOT Collector, Kubernetes install, Linux install and migration guide.
span.observer is an independent blog, not affiliated with Dynatrace LLC or Datadog Inc. Datadog and DDOT are trademarks of their owner. Examples come from the official documentation read on 30 October 2026: check them for your version.