
Module 3 of the Terraform Dynatrace SaaS course: GitOps Dynatrace SaaS means making the Git repository the single source of truth for configuration, then letting a pipeline apply it with Terraform.
Course: Terraform Dynatrace SaaS · Module 3/3 · Duration: ~50 min · Level: Advanced
Objectives:
- Organise a Terraform repository for several SaaS environments
- Build a pipeline: validation, a reviewed plan, then apply in dev and in prod
- Handle secrets and pipeline permissions without writing them into Git
- Promote the same commit from dev to prod and detect drift
Prerequisites: a good grasp of configuration as code, Terraform installed, modules 1 and 2 of this course (provider, import), a hosted Git repository and a Dynatrace SaaS test environment. This module does not apply to Dynatrace Managed.
The previous modules showed how to describe a configuration with the provider and then how to import what already exists. What remains is an operations question: who may change what, how is a change reviewed, and how do you stop a setting edited by hand in production from being forgotten? GitOps Dynatrace SaaS answers these three questions with a single workflow.
For reliability, the stakes are concrete. An alert rule changed without a trace lengthens diagnosis time (MTTR) and erodes trust in your SLOs. A change that is reviewed, tested in dev and then promoted lowers the risk of an incident caused by the configuration itself.
GitOps Dynatrace SaaS: the principle in four rules
- Git describes the desired state. The Terraform files (
.tf, modules, variables) are versioned there; the state and the secrets are not. - Every change goes through a merge request. A colleague reviews the code diff and the plan before the merge.
- A pipeline applies the change. No
terraform applyis run from a workstation, except for a test. - Any gap is fixed in Git. A setting edited by hand in the interface is drift: the Terraform plan shows it (see module 2) and the next apply overwrites it.
Organise the repository
A single repository suits a small team: it holds one folder per environment and, where needed, shared modules. Beyond that, split by domain (alerting, SLOs, access) to limit write permissions. The example below is a suggested layout, not a format imposed by the tool.
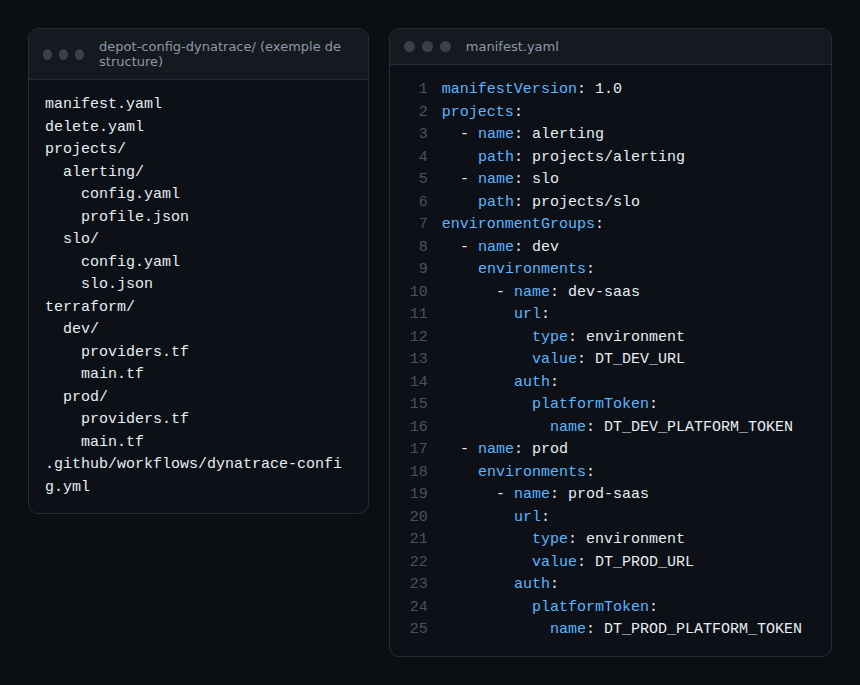
Plan one folder, and therefore one Terraform state, per environment: the dev plan must never be able to change prod. URLs and tokens do not appear in the files: the provider reads them from environment variables supplied by the CI vault. State and the remote backend were covered in module 2.
The deployment pipeline
A minimal pipeline has four stages. Each one runs on a specific check.
| Stage | Trigger | Command | What it guarantees |
|---|---|---|---|
| Validation | Merge request | terraform init -input=false then terraform validate |
Syntactically valid configuration, provider downloaded |
| Plan | Merge request | terraform plan -input=false -out=tfplan |
List of changes shown at review |
| Dev apply | Merge to the main branch | terraform apply -input=false tfplan |
Dev environment matches Git |
| Prod apply | Manual approval | terraform apply -input=false tfplan |
Controlled promotion |
The reviewed plan is the real barrier: more than the code, it shows what will be created, changed or destroyed. In the pipeline, save it with -out=tfplan and then apply that file, so the apply runs the plan that was reviewed rather than a fresh calculation. -input=false stops an automated run from waiting for input.
Here is an example GitHub Actions workflow that chains these stages. It was not run for this article; adapt folder, variable and secret names to your repository.
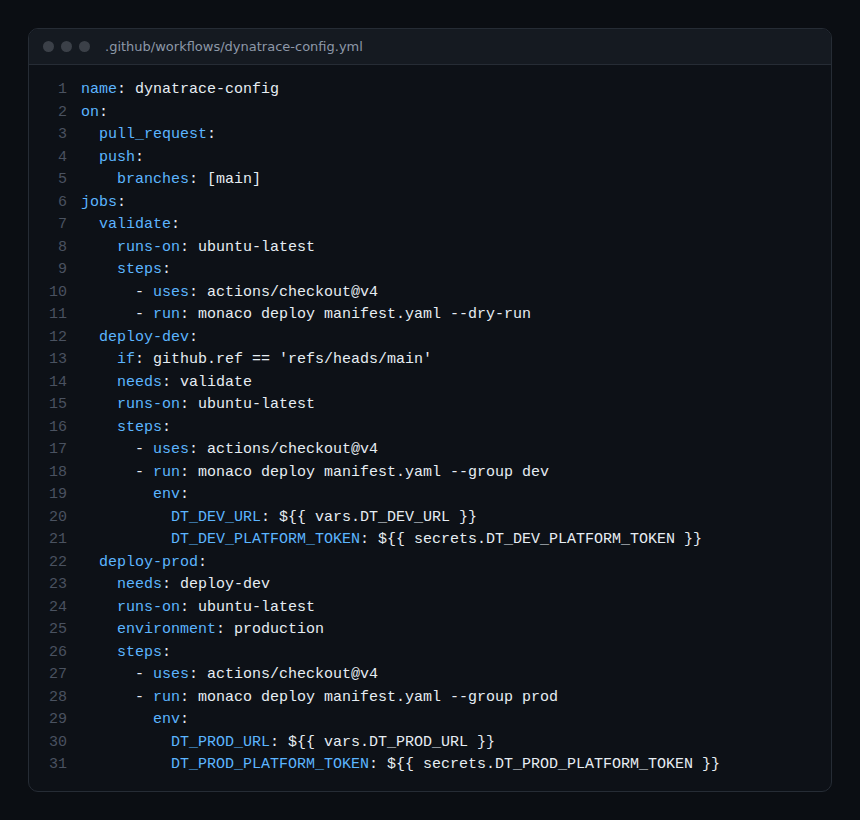
Two points to remember. The plan runs on every merge request, the apply only after the merge. And the production job declares an environment: in GitHub, an environment can require an approval before running, which makes the human review of the promotion concrete.
Read the plan exit codes
The pipeline commands are native Terraform commands: init, validate, plan, apply (list confirmed by the “Terraform CLI commands” page of the Dynatrace documentation). With -detailed-exitcode, terraform plan returns 0 when there is no difference, 1 on error, and 2 when changes exist (HashiCorp documentation).
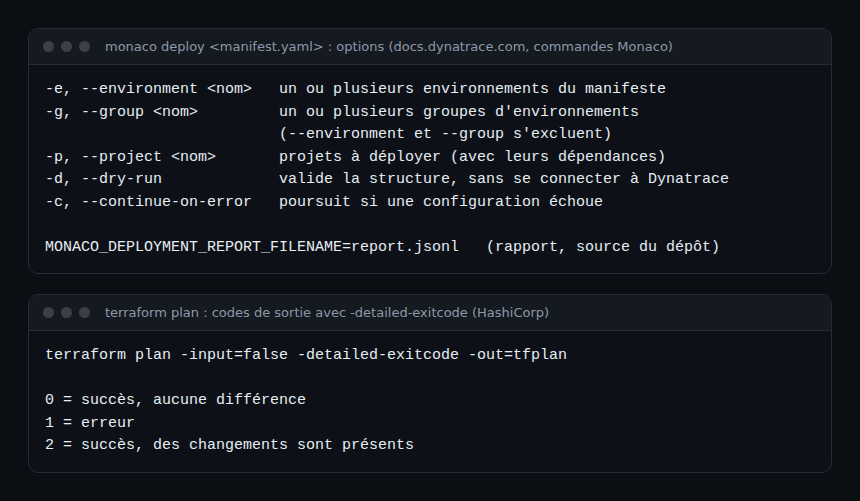
Exit code 2 is handy for a scheduled run that detects drift: if the plan is not empty although nobody merged a change, someone changed the environment by hand. In a step that blocks the merge, do not use this flag: code 2 would fail a plan that is perfectly normal.
Secrets and pipeline permissions
- Authentication: according to the provider’s
docs/index.mdfile,DYNATRACE_ENV_URLnames the environment,DYNATRACE_PLATFORM_TOKENsupplies a platform token, andDT_CLIENT_ID,DT_CLIENT_SECRET,DT_ACCOUNT_IDdescribe an OAuth client. WithDYNATRACE_HTTP_OAUTH_PREFERENCE=true, the provider prefers OAuth-compatible endpoints. - CI vault: these variables come from the repository or CI environment secrets, never from a versioned file. The URL, which is not secret, can be a plain variable.
- Least privilege: a separate token or client per environment, with only the scopes needed by the managed resources. Each provider resource page lists the scopes it requires.
- State: it may contain sensitive values. Store it in a remote backend with restricted access, never in Git, and add
*.tfstateto.gitignore.
A production token must be readable only by the production job, behind the approval. Never print it in pipeline logs.
Promote from dev to prod, and delete cleanly
Promotion means applying the same commit to the next environment. Avoid one branch per environment: it makes configurations diverge. Use a single history, shared modules and variables (thresholds, names) for the differences between the dev and prod folders.
Deletion is the delicate case: it must stay explicit. With Terraform, removing the resource from the code makes the destruction appear in the plan, so it can be reviewed like any other change. Read the destroy lines with particular care before approving the production apply.
Finally, an object should have a single owner. If you chose Monaco rather than Terraform for Dynatrace configuration, follow the Monaco SaaS course, which is separate from this one.
Hands-on exercise
Run it on a SaaS test environment, with two environments if possible (otherwise a single “dev” role). The commands in this exercise were not run while writing: check each result yourself.
Step 1 — Prepare the repository
Create a Git repository with an envs/dev folder holding the providers.tf from module 1 and a first resource, plus a .gitignore file excluding .terraform/ and *.tfstate. Expected result: no real token or URL in git grep.
Step 2 — Validate locally
Set DYNATRACE_ENV_URL and DYNATRACE_PLATFORM_TOKEN, then run terraform init and terraform validate in envs/dev. Expected result: validation ends without error; deliberately introduce a syntax error in a .tf file to see it fail.
Step 3 — Write the pipeline
Take the workflow shown above, declare the variables and secrets in your CI platform, then open a merge request. Expected result: only validation and plan run, and the plan is readable in the logs.
Step 4 — Merge and promote
Merge, check the dev apply, then approve production. Expected result: the configured object exists in the target environment, and only there.
Step 5 — Cause drift
Edit the object by hand in the interface, then run terraform plan -detailed-exitcode in envs/dev. Expected result: the plan shows the gap and the exit code is 2; a new apply restores the value from Git.
Quiz
- What does exit code 2 of
terraform plan -detailed-exitcodemean? a) Error b) No changes c) Changes are present d) Plan cancelled - Why save the plan with
-out=tfplanin the pipeline? a) To speed up the provider download b) To apply the plan that was reviewed c) To avoid using state d) To encrypt secrets - Where should the production platform token go? a) In a
.tffile b) In a CI secret readable only by the production job c) In the commit message d) In the versioned state file - How do you isolate dev and prod? a) One folder and one branch b) One folder, and therefore one state, per environment c) A shared token d) No need
Answer key
1: c, code 2 signals a non-empty plan. 2: b, the apply runs the reviewed plan. 3: b, a CI secret limited to the production job; no token goes in a versioned file. 4: b, the dev plan then cannot change prod.
Going further
- Managing SLOs with Terraform, a concrete use case for the pipeline
- Terraform for alerting and dashboards, to flesh out the repository
- Terraform commands in the official documentation
← Module 2: Terraform import for Dynatrace SaaS · Course overview · End of the course: back to the overview →
Frequently asked questions
Do I need a dedicated GitOps tool for Dynatrace?
No. A classic CI/CD pipeline that runs Terraform is enough. The GitOps principle is about discipline (Git as the source of truth, review, automated deployment), not about a product.
Can I promote from dev to prod with a single repository?
Yes: one folder per environment, each with its own state and credentials, plus shared modules. The same commit is applied first in dev, then in prod after approval. Differences between environments go through variables, not file copies.
What about a setting created by hand before Git was adopted?
Export it and import it into the state (module 2), review the resulting code, then merge it into the repository. Until it is there, an apply may contradict it.
This third module closes the course: you can install the provider, import what exists and now industrialise Dynatrace SaaS configuration with Terraform. Go back to the overview to revisit the modules.
span.observer is an independent community blog, not affiliated with Dynatrace LLC. This course does not replace the official Dynatrace University training and certifications. Check features in the official documentation for your version.