
Module 3 of the Terraform Dynatrace Managed learning path: GitOps Dynatrace Managed means making Git the single source of truth for configuration, validating it through review, then deploying it with a Terraform pipeline.
Path: Terraform Dynatrace Managed · Module 3/3 · Duration: ~45 min · Level: Intermediate
Objectives:
- Organise a Git repository and a Terraform pipeline that deploy the configuration
- Promote a configuration from dev to prod with review and approval
- Choose the pipeline tool for your team
- Prepare for a possible migration to SaaS
Prerequisites: modules 1 and 2 of the Terraform path, a Git repository with a CI system, a Managed staging environment and a production environment.
The previous modules showed how to describe configuration as code and how to manage state. What remains is deciding how a change is reviewed and in what order it reaches the environments. This module applies to Dynatrace Managed only: API tokens, Settings 2.0 and the classic configuration APIs, with no Grail and no OAuth.
GitOps Dynatrace Managed: the principle
The Managed documentation on configuration as code describes the mechanisms that GitOps relies on. Configuration can live in files organised in Git repositories. It can serve as a template for several environments. It can be promoted from one environment to the next after each deployment step. Finally, it follows the usual Git practices: pull requests, merging and approvals. The same page mentions integration with CI/CD pipelines.
For an SRE, a threshold change leaves a trace and goes through a review before production, which reduces the toil of manual fixes.
The principle comes down to three rules: the repository is the reference, every change goes through a reviewed pull request, and secrets stay in the CI vault.
Structuring the Terraform repository
A simple repository holds the Terraform files from module 1 (providers.tf, resources such as dynatrace_alerting), possibly the team modules from module 2, and a pipeline file. Here is a suggested layout, to adapt:
- one shared set of Terraform files that describes the configuration;
- variables specific to each environment (dev, prod), so the same code serves both;
- a separate state per environment, in a remote backend (module 2), never in Git;
- a
.gitignorefor.terraform/, state files and saved plans.
The last point follows from the CLI documentation: a plan written with -out contains the full configuration and the variable values, and the documentation asks you to treat it as a potentially sensitive artifact.
Pipeline secrets and permissions
With the provider, the DYNATRACE_ENV_URL and DYNATRACE_API_TOKEN variables configure access, according to the docs/index.md file in the provider repository. For a Managed environment, the URL contains the environment ID (https://<host>/e/<id>). Declare these two values as CI secrets: neither the URL nor the token appears in Git or in the logs.
Use a separate API token for dev and for prod, with only the scopes needed for the managed resources (settings.read and settings.write for the resource in the module 1 exercise) and an expiry date; bind the production token to a protected CI environment.
A three-stage pipeline
The Terraform CLI provides the automation options. -input=false disables prompts. terraform plan -detailed-exitcode returns 0 with no changes, 1 on error and 2 when changes are present. -out=tfplan writes the plan to a file, which terraform apply -input=false tfplan applies without asking for confirmation: the documentation describes this mode as intended for automation. It also recommends re-checking the final plan before applying it.
- Pull request: validation.
terraform init,terraform validate, thenterraform plan. Thevalidatecommand checks the syntax and internal consistency of the configuration; it does not validate remote state or the provider APIs, and it requires an initialised directory. Post theplanoutput in the pull request to show reviewers the differences. - Merge to the main branch: dev. The pipeline computes the plan, saves it, then applies it to the staging environment, in the same job.
- Approval, then prod. A production job depends on the dev job and waits for a manual approval before planning and applying with the production token.
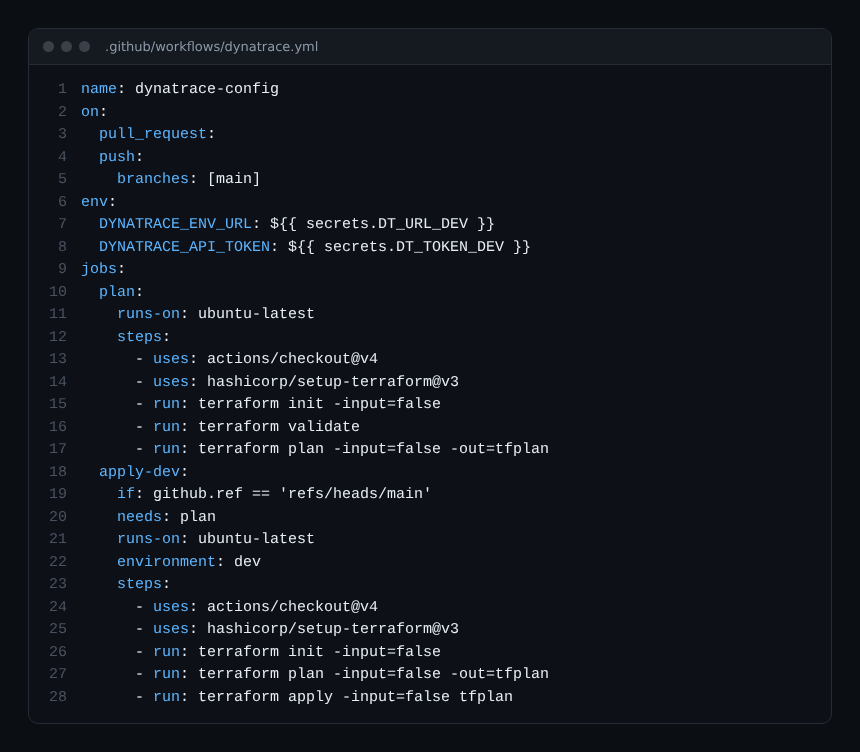
This file is an example written for this module; it has not been run. It illustrates the first two stages; the third is obtained by adding an apply-prod job that depends on apply-dev and targets a protected environment requiring approval.
Deleting through the repository too
With Terraform, removing a resource from the code makes it appear as a deletion in the plan: the pull request is what lets you review it before it is applied. Always examine the deletion lines of the plan before approving, especially in production.
Choosing the pipeline tool
Terraform does not depend on a particular CI engine: any system able to run the CLI, store secrets and require an approval will do. To decide, ask three questions:
| Question | Why it matters |
|---|---|
| Which CI system does your team already use? | Reusing it avoids one more tool to operate |
| Can it protect a production environment with an approval? | Promotion from dev to prod depends on it |
| Can it store secrets without printing them in the logs? | The API token must never appear in clear text |
If you chose Monaco rather than Terraform, follow the separate course: Monaco Managed course. Use only one tool per object: two tools writing the same alerting profile contradict each other.
Preparing the migration to SaaS
A versioned configuration makes the move to SaaS easier, but does not carry it out on its own. The “Migrate configuration” page of the Managed documentation states that the migration tools support only part of the configuration. Users, groups, IAM policies and tokens, in particular, must be redone by hand. A few habits to adopt now:
- separate the code from the variables specific to each environment: a SaaS target will simply add one more environment;
- mark in the repository whatever references entity IDs, because they do not exist on another environment.
The details are in the overall guide Migrating Managed to SaaS.
Hands-on exercise
Do this exercise on a Managed staging environment, never directly in production. The commands below were not run for this article: check them on your version.
Step 1 — Prepare the repository and the secrets
Create a repository with the Terraform code from module 1 and declare the DT_URL_DEV and DT_TOKEN_DEV secrets in the CI. Add the .gitignore for state and plans. Expected result: no token, no real URL and no state file in Git or in the logs.
Step 2 — Validate a pull request
Change a threshold in the dynatrace_alerting resource, open a pull request and let the job run terraform init, terraform validate and terraform plan -input=false -out=tfplan. Expected result: the job succeeds and the plan shows the change; if you deliberately introduce an HCL syntax error, validate fails.
Step 3 — Apply to dev
Merge, then check that the dev job runs terraform apply -input=false tfplan and that the threshold has changed in the environment. Expected result: the value in the interface matches the repository.
Step 4 — Promote to prod
Add the production job with an approval step, targeting a second staging environment that plays the role of prod, with its own token and its own state. Expected result: the deployment waits for approval before running.
Quiz
- What does
terraform plan -detailed-exitcodereturn when changes are present? a) 0 b) 1 c) 2 d) 3 - Why are the URL and token CI secrets rather than values in the repository? a) To speed up the plan b) To keep secrets out of Git and the logs c) Because Terraform refuses URLs d) To change tools
- What does
terraform validatedo? a) It applies the configuration b) It checks syntax and internal consistency, without validating remote state or the provider APIs c) It deletes missing resources d) It writes the plan to a file - Why should a plan written with
-outnot be committed? a) It is too large b) It contains the full configuration and the variable values c) It is encrypted d) Git refuses it
Answers
- c) 0 means no changes, 1 an error, 2 changes present.
- b) The values are read from the CI environment.
- b) The command validates neither remote state nor the provider APIs: an error can still occur at plan or apply time.
- b) The documentation asks you to treat a saved plan as a potentially sensitive artifact.
Going further
- Terraform and Dynatrace: alerts and dashboards
- Migrating Managed to SaaS
- Configuration as Code, Dynatrace Managed documentation
- terraform plan, HashiCorp documentation
← Module 2: Terraform import for Dynatrace Managed · Course overview
Frequently asked questions
Do you need one repository per environment?
No. A single repository is enough, with variables specific to each environment; promotion happens through the order of the pipeline jobs, not by copying files.
Can you change the configuration in the interface after a deployment?
Technically yes, but the next apply overwrites the value managed by the repository, and the drift check from module 2 flags it: make the pull request the only route.
How do you avoid applying to production by mistake?
Bind the production token to a protected CI environment, require an approval and review the plan before applying. A token limited to the useful scopes also reduces the impact of a mistake.
You can now describe, import, deploy and promote Dynatrace Managed configuration from Git with Terraform.
span.observer is an independent community blog, not affiliated with Dynatrace LLC. This course does not replace the official Dynatrace University training and certifications. Check features in the official documentation for your version.