
The Terraform provider Dynatrace SaaS lets you describe the configuration of a SaaS environment in .tf files, versioned like code. This module covers installation, authentication and the first resource.
Course: Terraform Dynatrace SaaS · Module 1/3 · Duration: ~45 min · Level: Intermediate
Objectives:
- Declare the
dynatrace-oss/dynatraceprovider and initialise it - Choose between an API token, a platform token and an OAuth client depending on the resource
- Supply the URL and credentials through environment variables
- Deploy a first Settings resource with
planthenapply
Prerequisites: a good grasp of configuration as code, Terraform installed, a Dynatrace SaaS test environment.
This module applies to Dynatrace SaaS only. The same provider can also address a Managed cluster, but that belongs to the other course and is not covered here.
The Terraform provider Dynatrace SaaS: role and scope
A Terraform provider is a plugin that turns declarative resources into API calls. The Dynatrace one is published as dynatrace-oss/dynatrace on the Terraform Registry. Its repository states that it is officially supported by Dynatrace and requires Terraform 0.13 or later.
Each resource maps to a configuration object: an alerting profile, an automatic tagging rule, an SLO, a document, and so on. This module assumes you picked Terraform to manage the configuration.
Installing the provider
The official documentation describes three steps: install the Terraform binary and add it to the PATH, check it with terraform version, then create a providers.tf file in a working directory to declare the provider.
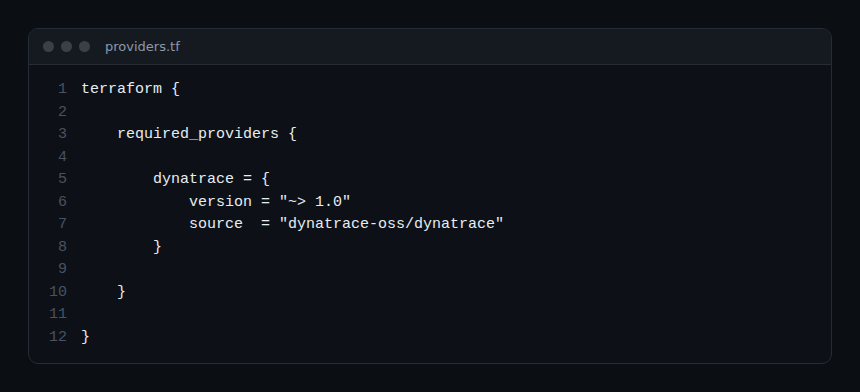
The line version = "~> 1.0" accepts any 1.x release. terraform init then downloads the provider from the Registry; on success the documentation page shows the message “Terraform has been successfully initialized!”.
SaaS authentication: three mechanisms
The provider is best configured through environment variables, which keeps secrets out of versioned files. According to the provider documentation, three mechanisms coexist.
| Mechanism | Variables | Use |
|---|---|---|
| API token (access token) | DYNATRACE_ENV_URL, DYNATRACE_API_TOKEN |
Resources backed by the classic and Settings APIs |
| OAuth client | DT_CLIENT_ID, DT_CLIENT_SECRET, DT_ACCOUNT_ID |
Platform resources (workflows, documents, OpenPipeline, segments…) |
| Platform token | DYNATRACE_PLATFORM_TOKEN |
Platform requests, in place of the OAuth client |
Three details from that documentation:
- for a SaaS environment, the URL looks like
https://########.live.dynatrace.com; - a platform token, when defined, is preferred over the OAuth client for platform requests, but it cannot be used for IAM (account management) or classic resources;
DYNATRACE_HTTP_OAUTH_PREFERENCE=trueasks the provider to favour OAuth-capable endpoints; without it, the API token is used. Some resources, such asdynatrace_json_dashboard, accept only the API token.
Each resource page lists the scopes or permissions it needs. Apply least privilege: do not create the all-access token listed on the provider home page if you manage a single object type. Create an OAuth client dedicated to Terraform, limited to the scopes it needs, and rotate its secret regularly.
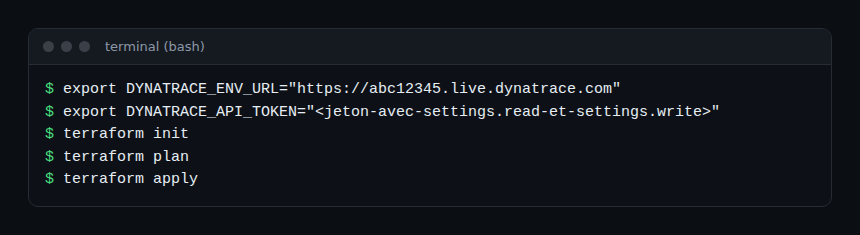
The screenshot shows the commands only, with example values: no output is displayed.
First resource: an automatic tagging rule
For a low-risk first try, the dynatrace_autotag_v2 resource fits: it configures automatically applied tags. Its page states that it requires the scopes Read settings (settings.read) and Write settings (settings.write), and that it relies on the schema builtin:tags.auto-tagging. An API token is therefore enough.
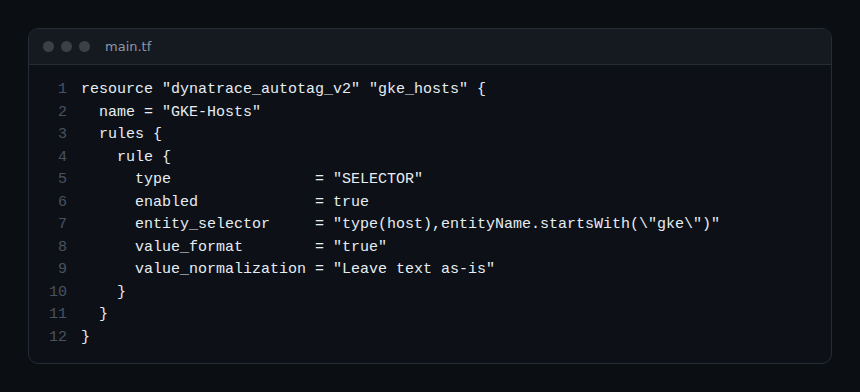
The example comes from the resource documentation. The SELECTOR rule uses an entity selector: type(host),entityName.startsWith("gke"). Hosts whose name starts with gke receive the tag.
The init, plan, apply cycle
Terraform always follows the same loop:
terraform init: downloads the provider;terraform plan: compares the code with the known state and shows what would be created, changed or destroyed;terraform apply: runs the plan after confirmation.
The plan is your safety net: always read it before applying. From an SRE viewpoint, reviewing that plan, more than writing the code, protects against configuration drift and cuts the toil of manual changes.
To diagnose an authentication failure, the provider documentation offers three variables: DYNATRACE_DEBUG=true, DYNATRACE_LOG_HTTP=<file> and DYNATRACE_HTTP_RESPONSE=true. Logs are written to the working directory; review them before sharing, as they contain HTTP exchanges.
Hands-on exercise
Run this on a SaaS test environment (free trial). The commands below were not executed while writing this module, so no output is reproduced. Compare with what your own terminal prints.
Step 1 — Prepare the directory
Create an empty directory and the providers.tf file from the first screenshot. Expected result: a short file declaring dynatrace-oss/dynatrace.
Step 2 — Create an API token
In your environment, create an access token limited to settings.read and settings.write. Expected result: a token shown once, to store in a secrets manager.
Step 3 — Export the variables
Export DYNATRACE_ENV_URL (a .live.dynatrace.com URL) and DYNATRACE_API_TOKEN, then run terraform init. Expected result: the successful initialisation message.
Step 4 — Plan and apply
Add main.tf with the resource from the third screenshot, adapting the name and selector. Run terraform plan, read the plan, then terraform apply. Expected result: a plan announcing one resource to create, then the rule visible in the environment’s automatic tagging settings.
Step 5 — Clean up
Run terraform destroy to remove the test rule. Expected result: the rule disappears from the environment.
Quiz
- What is the provider source in the
required_providersblock? a)dynatrace/dynatraceb)dynatrace-oss/dynatracec)hashicorp/dynatraced)terraform/dynatrace - Which variable holds the SaaS environment URL? a)
DYNATRACE_ENV_URLb)DT_ACCOUNT_IDc)DYNATRACE_DEBUGd)DT_CLIENT_SECRET - Can a platform token be used for classic resources? a) Yes, always b) Yes, with OAuth c) No d) Only for reads
- Which command shows planned changes without applying them? a)
terraform initb)terraform planc)terraform applyd)terraform version
Answers
- b) The source is
dynatrace-oss/dynatrace. - a)
DYNATRACE_ENV_URLdesignates the target environment. - c) The documentation states it cannot be used for IAM or classic resources.
- b)
plancompares the code with the state and writes nothing to the environment.
Going further
- Terraform provider for Dynatrace: alerting, management zones and dashboards
- SLOs with Dynatrace Terraform: one SLO per service
- Settings API schemas on SaaS
- Official documentation: Terraform and Dynatrace
- Provider documentation on the Terraform Registry
Course overview · Module 2: Terraform import for Dynatrace SaaS →
Frequently asked questions
Do I need an API token or an OAuth client?
It depends on the resource: each documentation page states the expected authentication. Classic Settings resources need an API token; platform resources, such as documents or segments, need OAuth or a platform token.
Can I write the URL and token in the provider block?
The provider schema exposes attributes such as dt_env_url and dt_api_token. The documentation nevertheless recommends environment variables: a secret written in a file ends up in Git.
Do I have to choose between Terraform and Monaco?
Yes, a configuration object has a single owner. This course covers Terraform; the Monaco course is separate. The comparison, with the official recommendation, is in Monaco or Terraform.
You can now declare the provider, authenticate it and deploy a first resource. The next module covers Terraform state, and importing and exporting existing resources.
span.observer is an independent community blog, not affiliated with Dynatrace LLC. This course does not replace the official Dynatrace University training and certifications. Check features in the official documentation for your version.