
Module 2 of the Terraform Dynatrace Managed learning path: the Terraform import Dynatrace Managed workflow brings configuration created by hand under code control, keeps it in a shared state and detects changes made outside the code.
Path: Terraform Dynatrace Managed · Module 2/3 · Duration: ~45 min · Level: Intermediate
Objectives:
- Explain the role of the Terraform state and choose a remote backend
- Export an existing configuration with the Dynatrace provider’s utility
- Import objects into the state, with the
-import-stateoption or animportblock - Detect drift and organise the code into modules
Prerequisites: module 1 (provider installed, Managed environment URL, API token) and a test environment, never production for a first attempt.
The previous modules started from an empty environment. Yet your cluster already holds years of configuration created in the interface. Without an import, Terraform ignores those objects and an apply would create duplicates.
The Terraform state: what it holds and where to keep it
Terraform compares three things: the code, the state and the real environment. The state is the register that links each resource block to the matching object in Dynatrace. By default it lives in a local file named terraform.tfstate. That is enough for a trial, not for a team: everyone must have the latest version.
A remote backend solves both problems. According to the HashiCorp documentation, the state is then written to shared storage, and full-featured backends offer locking that prevents concurrent runs. The choice of backend (S3, Azure Blob Storage, Google Cloud Storage, HCP Terraform and others) is a matter for your infrastructure.
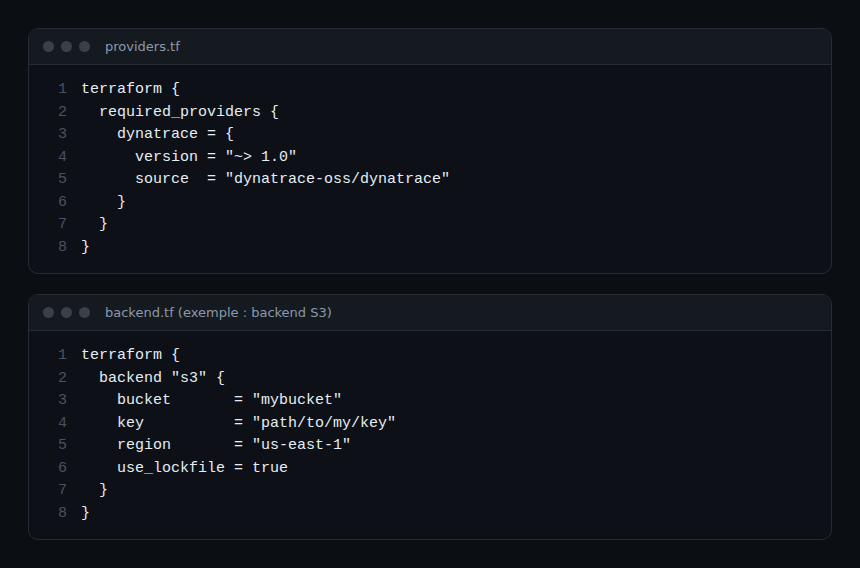
Two points of caution:
- The state is sensitive. HashiCorp states that it can contain secret values (tokens, passwords) and that a local state is a plaintext file. Keep it out of Git and encrypt it at rest when the backend allows.
- Locking depends on the backend. For S3 it is enabled with the
use_lockfileargument, which defaults to false. Check the equivalent option for your backend.
Export what exists with the provider’s utility
The Dynatrace provider also works as a standalone executable that exports an existing configuration. The documentation presents it as an alternative to writing code by hand and a way to build templates. This utility is not the terraform binary: it is the provider binary, which the documentation places typically under .terraform/providers/registry.terraform.io/dynatrace-oss/dynatrace/, in the version and platform folder.
For Managed, the environment is set with DYNATRACE_ENV_URL, in the form https://<dynatrace-host>/e/<identifier>, and the API token with DYNATRACE_API_TOKEN (provider README). The output folder is set with DYNATRACE_TARGET_FOLDER.
export DYNATRACE_ENV_URL="https://cluster.example.com/e/EXAMPLE"
export DYNATRACE_API_TOKEN="<token, never in the repository>"
export DYNATRACE_TARGET_FOLDER="./export"

./terraform-provider-dynatrace -export -list-exclusions
./terraform-provider-dynatrace -export dynatrace_alerting
The first command lists the resources excluded by default, including dynatrace_json_dashboard: a dashboard is exported only when requested explicitly. The second exports alerting profiles. The useful options are:
| Option | Effect (official documentation) |
|---|---|
-ref |
includes resources with their data sources and dependencies |
-migrate |
includes dependencies, without data sources |
-import-state |
initialises the Terraform modules and imports the resources into the state |
-id |
shows the identifier as a comment in the files |
-flat |
stores everything in the target folder, without a module structure |
-exclude |
excludes the listed resources |
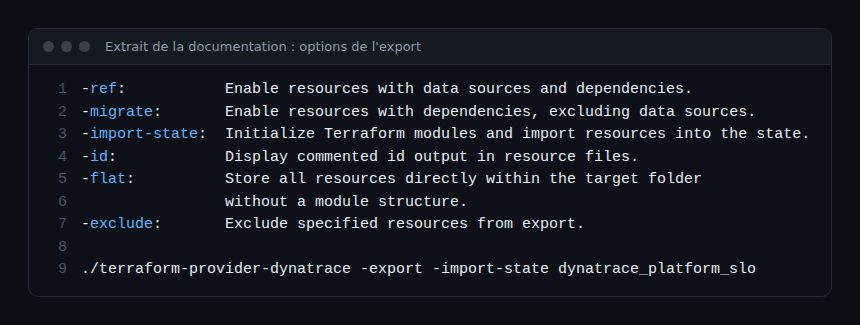
Without -flat, the export produces a main.tf file that calls one module per resource type. The provider code writes these blocks as module "alerting" { source = "./modules/alerting" }. Files that cannot be processed are moved to .flawed (obsolete or in need of changes) or .required_attention (missing information, for example confidential strings that no API returns). Review both folders before any apply.
Terraform import Dynatrace Managed: two paths
Path 1: the -import-state option
Exporting with -import-state initialises the modules and imports the exported resources into the state in one pass. The provider code confirms that if the Terraform CLI is missing, the import is skipped with a message. Configure the backend first so the state is shared straight away.
Path 2: the import block, resource by resource
According to the Terraform documentation, an import block declares the target address (to) and the object identifier (id). A resource block with the same address must exist. The identifier depends on the resource type: the Terraform documentation refers to the provider’s. The provider’s resource pages give no generic format; use the export’s -id option to read each object’s real identifier.
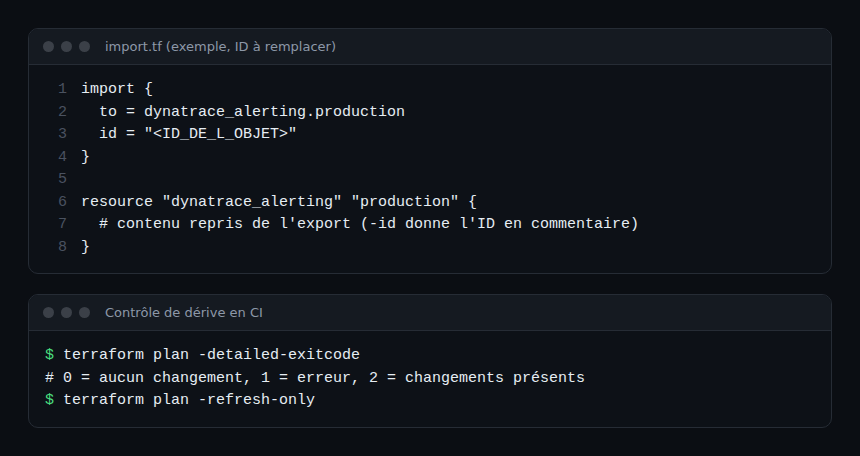
This path suits a gradual import, object by object, in an environment that already has code. Terraform can also generate code for imported resources with terraform plan -generate-config-out=PATH, but the documentation calls it experimental: review the result as you would an export.
Drift: detect what changes outside the code
An administrator edits an alerting profile in the interface during an incident: that is drift. terraform plan refreshes the state from the environment, then shows the gap with the code. Two tools serve the SRE:
terraform plan -detailed-exitcodereturns 0 for no changes, 1 for an error, 2 when changes exist. A scheduled job can therefore alert on exit code 2.terraform plan -refresh-onlyupdates the state to reflect changes made outside Terraform, for example during an incident. Use it when the manual change is legitimate, then carry it into the code.
The benefit shows in MTTR and toil: you quickly identify the manual change that explains unexpected behaviour. The attitude stays blameless: drift points to a gap in the process, not to a fault.
Modules: factor the configuration
The Dynatrace documentation lists grouping components into reusable modules among the provider’s advantages. The export already produces one per resource type. For several Managed environments, write a team module (alerting profile, management zone, notification) called with variables: the same code deploys to staging, then to production. Module 3 ties this idea to GitOps.
To compare the two tools, read Monaco or Terraform and configuration as code with Monaco.
Hands-on exercise
Managed test environment only. The commands below were not run for this article: no output is given, and the exact behaviour on a Managed cluster is for you to observe.
Step 1 — Configure the backend
In a working folder, create providers.tf and backend.tf as in the first screenshot, with a backend from your infrastructure. Run terraform init. Expected result: Terraform reports the backend and provider initialisation.
Step 2 — Export one resource type
Set DYNATRACE_ENV_URL, DYNATRACE_API_TOKEN and DYNATRACE_TARGET_FOLDER, then export dynatrace_alerting with -id. Expected result: a folder containing main.tf and a modules subfolder. Check .flawed and .required_attention.
Step 3 — Import and check
Run the export again with -import-state, then terraform plan in the exported folder. Expected result: ideally no changes; otherwise, analyse each difference before applying anything.
Step 4 — Cause drift
Edit an alerting profile in the interface, then run terraform plan -detailed-exitcode and note the exit code. Expected result: code 2 and a described difference. Fix either the code or the environment.
Quiz
- Why prefer a remote backend to a local state file in a team? a) It makes Terraform faster b) It shares the state and, depending on the backend, locks concurrent runs c) It removes the need for an API token d) It encrypts the HCL code
- Which export option imports resources into the state? a)
-refb)-flatc)-import-stated)-id - What does exit code 2 of
terraform plan -detailed-exitcodemean? a) Error b) No changes c) Success with changes present d) Plan cancelled - What does the
.required_attentionfolder contain? a) Export logs b) Files missing essential information, for example sensitive data c) State backups d) Reusable modules
Answers
- b. The state is shared and, with a full-featured backend, locked during runs.
- c.
-import-stateinitialises the modules and imports the resources into the state. - c. 0 means no changes, 1 an error, 2 changes present.
- b. These files lack information, such as secrets the API does not return.
Going further
- Dynatrace Terraform provider: alerting, management zones and dashboards
- Dynatrace SLOs with Terraform
- Monaco Managed to SaaS: export and replay the configuration
- Dynatrace Managed documentation: Configuration as Code via Terraform
- Dynatrace Terraform provider repository
← Module 1: Terraform provider · Path overview · Module 3: GitOps →
Frequently asked questions
Should you import or start from scratch?
Import if the environment already carries useful configuration: starting from scratch risks duplicates or overwritten settings. Start from scratch only on an empty environment.
Are dashboards exported?
Not by default. The documentation says dynatrace_json_dashboard and other resources are excluded unless requested explicitly. -list-exclusions gives the full list.
Do OAuth or platform tokens apply to Managed?
The export pages of the documentation mention platform tokens and OAuth, which belong to the SaaS platform. For Managed, this module relies on DYNATRACE_ENV_URL and DYNATRACE_API_TOKEN. The export page does not exist in the Managed documentation: using the export on a Managed cluster was not tested here.
State, import and drift checks turn a hand-configured cluster into reproducible configuration. Module 3 assembles these pieces into a GitOps pipeline with reviews and promotion between environments.
span.observer is an independent community blog, not affiliated with Dynatrace LLC. This path does not replace the official Dynatrace University training and certifications. Check features against the official documentation for your version.