
Module 1 of the Terraform Dynatrace Managed learning path: the Terraform provider Dynatrace Managed, its installation, its authentication and a first resource written as code.
Path: Terraform Dynatrace Managed · Module 1/3 · Duration: ~45 min · Level: Intermediate
Objectives:
- Install the Terraform CLI and declare the
dynatrace-oss/dynatraceprovider - Authenticate the provider against a Managed environment with the environment URL and an access token
- Write, plan and apply a first resource
- Know where the environment ends and the cluster begins
Prerequisites: a good grasp of configuration as code, Terraform installed, a Managed test environment and the right to create an access token in it.
Terraform describes configuration with a declarative language (HCL), a state and a plan then apply cycle. This module installs the Terraform provider for Dynatrace Managed, which is the same provider as for SaaS, configured against a Managed environment. It ends with a first resource that you can change, replay and delete. The content applies to Dynatrace Managed only.
Terraform provider Dynatrace Managed: what to know first
The provider is published in the Terraform Registry as dynatrace-oss/dynatrace. Its source code lives in the dynatrace-oss/terraform-provider-dynatrace repository under the Apache 2.0 licence. The repository documentation states that the provider is officially supported by Dynatrace and must be given credentials before use.
One provider covers both SaaS and Managed. What changes is the shape of the environment URL and the type of credentials. The provider documentation gives two URL forms:
| Environment type | Shape of DYNATRACE_ENV_URL |
|---|---|
| SaaS | https://########.live.dynatrace.com |
| Managed | https://<dynatrace-host>/e/##################### |
In this path only the second row matters: your cluster host name, then /e/ and the environment ID. The platform tokens and OAuth clients that the provider documentation also describes concern the SaaS platform. They are not used here.
Install Terraform and declare the provider
The official page “Install Terraform CLI and set up Configuration as Code via Terraform” summarises the procedure. First install the Terraform CLI by downloading the binary for your system, add it to the PATH and check it with terraform version. The provider itself is fetched automatically by terraform init.
Then create a working directory and a providers.tf file. The required_providers block is the one from the documentation.
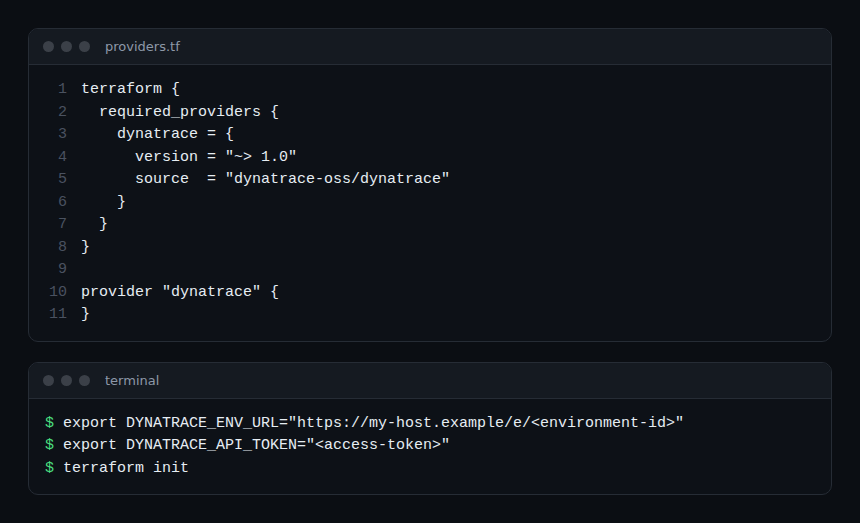
The ~> 1.0 constraint accepts any 1.x version. In production, pin an exact version and commit the .terraform.lock.hcl file generated by terraform init (a general Terraform practice).
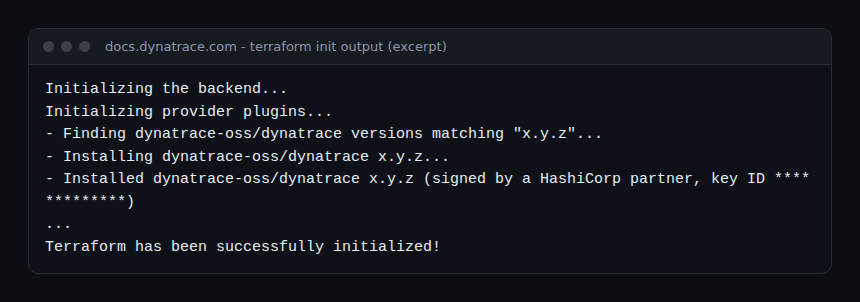
The official documentation shows the expected output of terraform init. It starts with the backend, then the provider plugins, and ends with “Terraform has been successfully initialized!”.
Managed authentication: environment URL and token
The provider documentation recommends configuring authentication with environment variables. Two are enough for a Managed environment:
DYNATRACE_ENV_URL: the environment URL, shaped likehttps://<dynatrace-host>/e/<id>;DYNATRACE_API_TOKEN: an access token.
The provider code also accepts the aliases DT_ENV_URL and DT_API_TOKEN. The matching attributes of the provider "dynatrace" block are dt_env_url and dt_api_token (the latter is marked sensitive). Avoid writing them in clear text in a versioned file.
Create the token with the right scopes
In the environment UI, open Access Tokens and generate a new token, as described on the Managed “Access tokens” page. The scopes depend on the resources you manage, and each provider resource page lists its own. The resource used below, dynatrace_alerting, requires Read settings (settings.read) and Write settings (settings.write). The Managed documentation describes them as read access to GET requests of the Settings API and write access to POST and DELETE requests.
Apply least privilege: a token limited to the scopes of the managed resources, not the “everything” token from the provider documentation. An over-broad token increases the blast radius of a leak.
Environment or cluster: two sets of credentials
The provider schema also contains dt_cluster_url and dt_cluster_api_token, described as the Managed cluster URL and the token for the Managed cluster APIs. They serve the resources in the “Cluster Management” category (for example dynatrace_managed_preferences, which requires the ServiceProviderAPI scope on the cluster token). Environment resources, including the one in this module, do not need them. If you use them later, keep two separate tokens. Creating the cluster token is not covered here: not verified in the Managed documentation consulted.
First resource: an alerting profile
The dynatrace_alerting resource manages Alerting profiles through the Settings 2.0 schema. The attributes include_mode, delay_in_minutes and severity_level are required in a rule block; name is required on the resource. The example below uses only those.
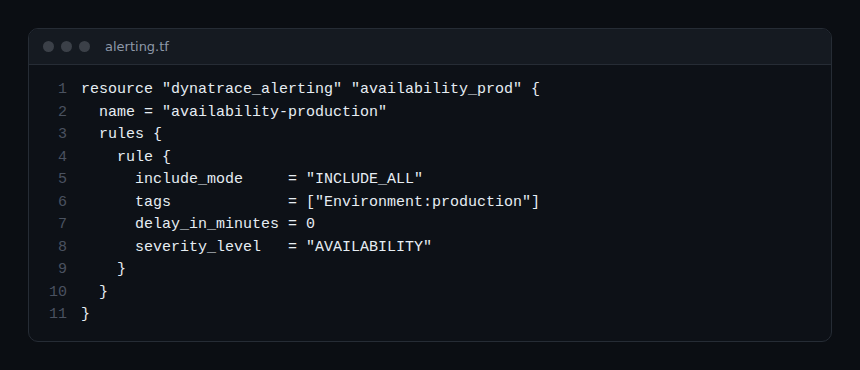
Critical lines:
include_mode = "INCLUDE_ALL": the rule applies to entities carrying all the listed tags (at most 10 according to the resource documentation);severity_level = "AVAILABILITY": one of six accepted values (AVAILABILITY,CUSTOM_ALERT,ERRORS,MONITORING_UNAVAILABLE,PERFORMANCE,RESOURCE_CONTENTION);delay_in_minutes = 0: notify as soon as the problem opens.
Hands-on exercise
Run the exercise on a Managed test environment. The Terraform commands below are the standard CLI commands; they were not run while writing this module, so no output is reproduced.
Step 1 — Prepare the directory
Install Terraform, create a tf-dynatrace-managed directory and add the providers.tf file from the first screenshot. Expected result: terraform version prints the installed version.
Step 2 — Create the token and export the variables
Generate a token with settings.read and settings.write. Export DYNATRACE_ENV_URL (shape https://<host>/e/<id>) and DYNATRACE_API_TOKEN in your terminal. Do not write them in any repository file.
Step 3 — Initialise
terraform initExpected result: a successful initialisation message, as in the documentation excerpt.
Step 4 — Plan then apply
Add alerting.tf, then run:
terraform plan
terraform apply
The plan should announce the creation of one dynatrace_alerting.availability_prod resource. After confirmation, the profile appears in the environment’s alerting settings.
Step 5 — Check and clean up
Open the alerting profiles in the UI and confirm the new profile. Run terraform plan again: with no change, it should propose nothing. Finish with terraform destroy to remove the test profile.
How to check that it works
Two signs: the profile exists in the UI, and a second terraform plan reports up-to-date infrastructure. On an authentication error, the provider names the missing DYNATRACE_ENV_URL, dt_env_url or DYNATRACE_API_TOKEN. For finer diagnosis, the documentation offers DYNATRACE_DEBUG=true and DYNATRACE_LOG_HTTP=terraform-provider-dynatrace.http.log, which write logs in the working directory. Those logs may contain environment data: review them before sharing.
Best practices
- One token per use, with only the required scopes, and a planned rotation.
- Environment variables or the pipeline’s secret store, never a token in the repository.
- A
.gitignoreentry for.terraform/and state files: state can hold sensitive values (module 2 covers state and remote backends).
Quiz
- Which environment URL shape applies to Managed? a) https://abc.live.dynatrace.com b) https://<host>/e/<id> c) https://abc.apps.dynatrace.com d) https://sso.dynatrace.com
- Which command downloads the provider? a) terraform plan b) terraform apply c) terraform init d) terraform fmt
- Which environment variable carries the provider’s access token? a) DYNATRACE_API_TOKEN b) DT_CLIENT_SECRET c) DYNATRACE_PLATFORM_TOKEN d) DYNATRACE_DEBUG
- Which scopes does the dynatrace_alerting resource require? a) ReadConfig and WriteConfig b) settings.read and settings.write c) ServiceProviderAPI d) slo.read and slo.write
Answers
- b) A Managed URL holds the cluster host, then
/e/and the environment ID. - c)
terraform initfetches the provider from the Registry. - a)
DYNATRACE_API_TOKEN(aliasDT_API_TOKEN); the others concern OAuth, the SaaS platform or debugging. - b) The resource page lists
settings.readandsettings.write.
Going further
- Monaco or Terraform: which tool for Dynatrace configuration?
- Terraform and Dynatrace: alerting and dashboards as code
- Dynatrace Monaco: configuration as code
- Documentation: install the Terraform CLI and the provider
- Dynatrace Terraform provider repository
Path overview · Module 2: State, import and drift with Terraform →
Frequently asked questions
Does the same provider work for Managed and SaaS?
Yes, the provider is the same. The documentation gives two environment URL forms, one for SaaS and one for Managed. Platform tokens and OAuth clients concern SaaS only.
Is the cluster token needed for usual resources?
No. The cluster token (dt_cluster_api_token) serves the Cluster Management resources. Environment resources authenticate with the environment URL and the access token.
Why does my terraform plan fail on authentication?
Check the two variables first, then the token scopes, which must match the resource page. Then enable the documentation’s debug variables to read the HTTP exchanges.
The provider is installed, authenticated, and a first resource now lives in code. The next module covers what makes Terraform robust in practice: state, remote backends, importing existing resources and drift.
span.observer is an independent community blog, not affiliated with Dynatrace LLC. This learning path does not replace the official training and certifications from Dynatrace University. Check features against the official documentation for your version.