The Datadog Sensitive Data Scanner finds personal data in your logs and masks it before anyone can read it. For an SRE or platform team, it is a practical safeguard: an email address, a card number or a token that leaks into an error message has no place in a tool the whole team browses.
This tutorial follows the official Datadog documentation, read on 30 October 2026. It covers creating a scanning group and a rule, choosing the action (redact, hash), and the limits of the regex syntax. No price is quoted here: see Datadog’s official pages for commercial terms.
Datadog Sensitive Data Scanner: what it does
According to the documentation, the Sensitive Data Scanner (SDS) discovers, classifies and, optionally, redacts sensitive data: PII, credentials, card numbers. For telemetry it covers logs, APM spans, RUM events and Datadog events. Logs can be scanned in the Datadog cloud, or in your own environment with Observability Pipelines.
Two concepts structure the tool:
- a scanning group defines what data to scan (a filter query, products, a sampling rate);
- scanning rules define what to look for: library rules (email addresses, credit cards, API keys, authorization tokens and more) or custom regex rules.
Permissions, according to the setup page: the Datadog Admin role is enough by default. Otherwise, a custom role receives data_scanner_read (view) or data_scanner_write (set up) under Compliance. The Data Scanner Unmask permission reveals values hidden by the Mask action.
Step 1: create a scanning group
- Open the Sensitive Data Scanner settings page and click Add scanning group.
- Enter a filter query. The “Logs” or “APM Spans” preview shows the matching data.
- Give it a name and a description.
- Turn on the products to scan: Logs, APM spans, RUM events, Datadog events.
- Optionally set a sampling rate from 10% to 99% per product.
- Click Create, then turn on the group’s toggle: a new group starts disabled.
Watch out: the documentation says a sampled group cannot use the obfuscation actions. For sensitive data, do not sample: a partial scan would let some values through in clear text. Masking with OpenPipeline on the Dynatrace side follows the same logic: act before storage, on the whole stream.
Step 2: add a rule and choose the action
Open the group, click Add Scanning Rule, then pick a library rule or a custom rule. For a library rule, you set the Priority, select rules under “Add Library Rules”, then the Action on Match. For a custom rule, you also enter a regex under “Match conditions” and test it on a sample before saving.
“Action on Match” also sets the scope: Entire Event (with optional attribute exclusions) or Specific Attributes (a list of attributes to scan). In attribute paths, the documentation asks you not to write the @ prefix.
Redact, Partially Redact, Hash or Mask?
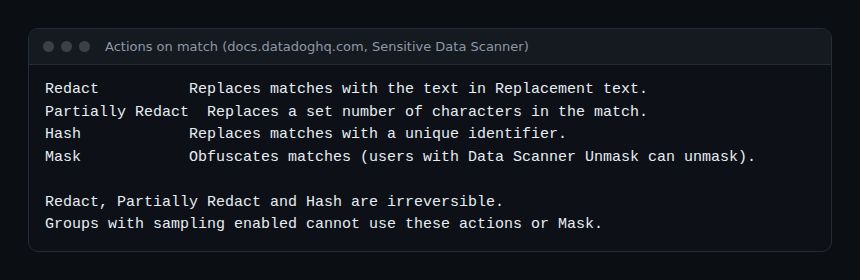
- Redact replaces the value with text of your choice. Simple and readable:
[EMAIL]in a log is immediately clear. - Partially Redact replaces a number of characters you choose, on the part of the value you designate. Useful when only a fragment should stay visible.
- Hash replaces the value with a unique identifier. The replacement is irreversible: the original data is no longer readable.
- Mask obfuscates the value, but users holding
Data Scanner Unmaskcan reveal it. The overview page lists Mask as available for logs, APM and RUM, but not for events.
Redact, Partially Redact and Hash are irreversible, the documentation states. That is what you want for data that must no longer exist in clear text. Mask suits cases where a few authorised people must be able to read the value again.
Finally, add tags to the events that match. Datadog recommends sensitive_data and sensitive_data_category; they let you search and count the leaks you prevented.
Step 3: write a regex rule within the PCRE limits
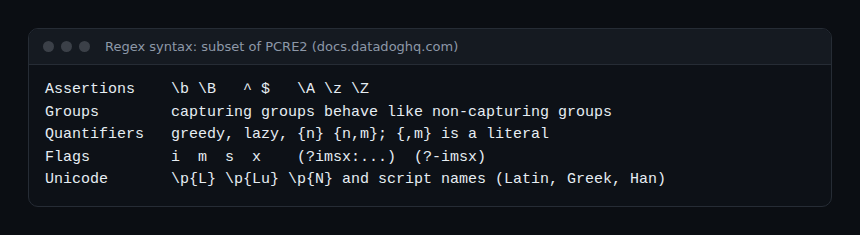
The syntax page says the SDS regex is “a subset of PCRE2”. The supported families are alternation, assertions, character classes, groups, quantifiers, flags and Unicode properties.
Here is what the documentation says, and what it does not say:
- Among assertions, only word boundaries (
\b,\B) and line and text anchors are listed. Lookaround ((?=,(?<=) is therefore not described as supported. - Capture groups behave like non-capturing groups and their names are ignored. A backreference therefore makes no sense here.
- The
{,m}form is read as literal text, and spaces inside the braces also turn a quantifier into a literal.
The lookaround and backreference point is not written as “unsupported” in so many words: the page simply does not list them. Treat them as unavailable, and test your regex in the interface’s sample field before deploying it. This point remains to be confirmed with the product.
A custom rule example, written by span.observer to illustrate the syntax (not taken from the documentation). To spot a customer identifier made of CLI- followed by eight digits, without lookaround:
\bCLI-[0-9]{8}\bThen add nearby keywords to cut false positives. According to the setup page, a rule accepts up to 20 keywords, which must appear within 30 characters before the match by default.
Limits to know
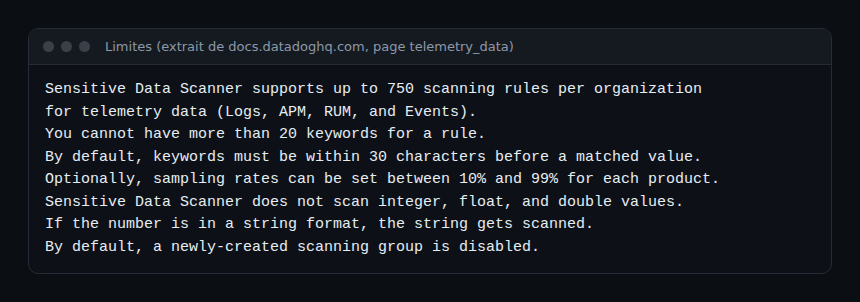
Two limits often surprise people. First, integer, float and double values are not scanned; numbers written as strings are. A card number stored as an integer in a JSON attribute therefore escapes the scan, yet is caught when it is a string. Second, for logs, alert notifications carry the finding context and a link, but no log sample.
How to check that it works
- Send a test log with a fake value (never real data) that matches your rule.
- Open the log in the Log Explorer: the value should appear replaced.
- Filter on the
sensitive_datatag to count the affected events.
Link with OpenTelemetry and Dynatrace
Masking in the backend is a last safety net. If your logs go through an OpenTelemetry Collector, upstream processing removes the data before it is sent: see our guide to the OpenTelemetry Collector on Kubernetes and the one on the Datadog Collector (DDOT). To compare approaches, the Dynatrace and Datadog comparison places both tools in an SRE context. No integration between the SDS and Dynatrace is documented here.
Best practices
- Mask as early as possible: at the Collector first, with the SDS as a safety net.
- No sampling on a group that protects sensitive data.
- Test every regex on a sample and avoid what the syntax does not list.
- Keep Mask for investigation needs, Redact or Hash for the rest.
- Track the
sensitive_datatag on a dashboard: a rise points to a code defect to fix.
Frequently asked questions
Does the Datadog Sensitive Data Scanner support lookaround?
The documentation describes the syntax as a subset of PCRE2 and lists only word boundaries and anchors as assertions. Lookaround is not there: not verified as supported, so test before use.
What is the difference between Redact and Hash?
Redact replaces the value with text of your choice. Hash replaces it with a unique identifier. Both are irreversible, according to the documentation.
Can you scan anything other than logs?
Yes: APM spans, RUM events and Datadog events. The documentation also mentions AI agent observability traces, S3 buckets (detection only, no redaction) and code repositories.
Conclusion
A scanning group without sampling, a library rule, an irreversible action and a tracking tag: this base already covers most common leaks in logs. Then add custom regexes, staying within the PCRE2 subset Datadog describes.
Independent blog, not affiliated with Dynatrace LLC or Datadog Inc. The information comes from Datadog’s official documentation, read on 30 October 2026; no price is quoted. Sources: Sensitive Data Scanner, telemetry setup, custom rules.